Heath Schreiweis
Designer

Follow Me

5 tips for marketing your small business

Whether your business is just starting out or whether you’ve been established for generations, marketing is a must. And marketing in regional communities with their economic downturns such as in the Central Queensland region is more important than ever. Smart marketing (not expensive marketing) can give you the edge to succeed in any economy.

  1. Determine your brand
    A brand is much more than a logo. It encompasses everything people see, hear, think and feel about your business. It tells your potential customers a story about you and your business. Is your business a family friendly business, located firmly in the local community? Do you want to portray your business as being old and well established or new and edgy? Once determined, your brand should be represented in your website, your brochures and every piece of written material such as your business cards.
  2. Know your customers
    Identify who your target market is. Who do you think would buy your product or service? Is it newly married couples? First home buyers setting up their house? Retired couples? Women? Men? Children? You need to take the time to determine who your customers are so that you can make sure your website design, your branding, your advertising and your slogans and content ‘speak’ to your customers.
  3. Advertising
    Once you have identified your customers you can tailor your advertising to your customers. Advertise in a ‘bespoke’, ‘boutique’ way. Don’t advertise like a big business with a one size fits all approach to promoting your products and services. Take the time to tailor your ads to your customers.
  4. Take advantage of your current customers
    Your current customers know your products or services. You have already converted them to your business. They are now potentially your best advertisers. Connect with these customers through social media or an e-newsletter and encourage them to forward information and promote your business to their friends and family.
  5. Promote community events
    On your Facebook site or website, share community events that reflect your business values. You might like to let your customers know about great things that are happening throughout the Gladstone Libraries or a school fete that is coming up in Rockhampton. By sharing these community events, people associate your business with a positive community event. It implies that your business is concerned about local people and local events. In turn the libraries and schools will see that your business is supportive of them and they and their customers may support you in return.
Getting your small business on Facebook

Facebook is not just for sharing photos of cranky cats and smiling babies with your uninterested friends. It is actually a hugely important way to get thousands of people interacting with your business online and offline.


Facebook is also not just for young people. The growing demographic for Facebook is the over 40s age group. There are also more women than men using Facebook and as most businesses know women are generally the purchases, providers of information and decision makers in the household.


Here are steps you can follow to set up your Facebook page:


  • Research other businesses Facebook pages
    One of the best things you can do before creating your business page is to research some other Facebook pages especially pages belonging to your competitors. Have a look at their pages and take note of not just how they look, but how they interact with their customers.
  • Set up a Page
    You need to get a Facebook Page, not a ‘profile’. A profile is for a personal use, businesses need a ‘page’. If your business has a profile you need to change to a page as Facebook regularly deletes these without notice and then you will have lost all of your followers!
  • Add your information
    Make sure you add a really detailed set of information like your business address, services, opening hours and what it is that you do. Make it as detailed as possible.
  • Add some photos
    Click the “Photo” link up the top and then “Create an album” and go ahead and add some photos of your shopfront, your staff or your town. Then create another album for your various product lines. People can now share these with their friends. Make sure you give them all meaningful captions.
  • Add a profile photo
    You’ll need a profile photo. This is the little photo on the left hand side. This is the image that people will see in their feeds so it needs to represent your business’ brand. A logo is generally the best option as this will reinforce your business messaging. It should be at least 180 pixels wide.
  • Invite your friends
    If you are already active on Facebook as a personal user it is a good idea to invite all your friends and get them to spread the word. This can give you a really important initial boost.
  • Start interacting
    Now you can begin interacting with current and potential customers. You can share photos, ideas, tips – anything that will compliment your brand and make people want to receive your posts.


To build up your initial following you might like to consider investing in Facebook advertising. For a very small amount of money you can put your Facebook page in front of a lot of people. When you purchase the ad space you select the demographic of the people you want to see your ad. Once you have a large amount of followers they will do your marketing for you by ‘liking’ and ‘sharing’ your posts. This is also why you need to make your posts interesting, funny or informative.

Involving the client during the web design process

I was fortunate enough to recently develop and conduct a course on website design inception for one of our clients.

Our team recently determined that it was necessary to orchestrate a workshop that focussed on enabling clients to think more broadly about their brand, their business ethos and most importantly the end user rather than only concentrating on the site requirements. After testing and positive feedback from this method, we determined to use this approach as a standard for all new website development projects.

This process was designed to address specifically:

  • The client’s uncertainty about what the website was to deliver
  • The client’s requests that were out of the scope of regulations, timeline or budget
  • Varying design ideas and options amongst client panel members
  • The clarification of terminology/language between the client and us as developers
  • The difficulties in identifying the target audience and the design of a site with the end user foremost in mind.

The workshop

After a few weeks of investigation and design, the UX team and I developed a 3-4 hour workshop that provided participants with a baseline of technical/web development language, and a basic understanding of the design process. The success of the workshop also focussed on getting the participants thinking about the user and their experience when traversing a website, and as the designer, coming away feeling confident with a direction when designing the website.

The workshop divided into three different sections:

  • User experience design
  • Aesthetics
  • Structure

User Experience Design

The intention of the focus in this section is to give the client an understanding of user experience design. Participants were encouraged to start thinking about the user's state-of-mind when interacting with a website in general. The focus was to help the clients to understand that website design that is easily navigated, naturally intrinsic and accessible will provide the user with a positive experience and thus guarantee that they will want to return to the website.

This section also begins to introduce website language via labelling the various elements and terminology to participants. It also provides an opportunity for a quick look at the current design and user data trends.

I found that I could quickly skim through this content as it was intended to be a brief overview and also because the participants were well informed and up to speed on this topic. I provided a couple of examples of common websites, their evolution, and functionality, as well as examples of good user experience versus bad user experience.

A few topics we covered were:

  • The flow of interaction (how a user interacts with a website, from what they see to what they do)
  • Understanding a User Experience
  • What makes a good website experience?

Visual design, typography, user interface design, interactive design and usability/accessibility. 

Aesthetics

Where the fun begins, after a short introduction:

“Aesthetics: a set of principles concerned with the nature and appreciation of beauty. The branch of philosophy which deals with questions of beauty and artistic taste.”

We moved onto a series of activities that at first seemed a bit wishy-washy, but started by putting the attendees into a frame of mind for creativity.

Activity 1: Your famous person

If your organisation were a famous person (fictional or non-fictional) who would it be? And why?

At first, clients were a bit sceptical, looking at each other like ‘is he for real?’ but luckily we had some die-hard creatives in the group who helped to start the conversation. This created a great flow in the group, with myself writing down notes on a large piece of butcher’s paper (despite all the technology available in the world, nothing beats post-its and butcher’s paper!). Characters like ‘wonder women’ and ‘Luna Lovegood (from harry potter books)’ where mentioned.

It also queued things up perfectly for the second activity.

Activity 2: The waiting room

Imagine your organisation has a waiting room/reception hall, Ask yourself?

Followed by a series of questions that sparked thought proving responses, such as:

  • How big would it be?
  • What’s hanging on the walls?
  • Is there a receptionist? Or a concierge?

By this time the group was warmed up and already talking about different ideas. One of the best responses was ‘an airport terminal, arrivals and air stewards’ which fitted the genre of the project, other keywords were ‘light and bright’ and ‘open plan’. As the lead web designer for the project, in the back of my head this helped dramatically in drafting up ideas as the project progressed.

As an extra tool for this activity, I made an A4 page that I would hand out with questions and keyword prompts for those people who might be struggling with the task. But I would suggest that if there is a clear flow of creativity developing amongst the group, then there is no need for these prompts (as they may direct design rather than assist it).

Structure

After a short break, we moved on from the feel and emotions of the website and took a glance at the more practical, look and structure of the site.

It began with a short introduction of the grid, (without going too much into the technical language) how sites using frameworks such as bootstrap adheres to rows and columns and allows the site to have a structure and respond smoothly to various devices and the simplicity or complexity of how a grid can appear.

We then moved to the first activity of this section.

Activity 3: Design your book cover

Design a book cover that would best reflect your subject matter

An excellent way to prioritise the main messages the client may have.

The client is given a large sheet of paper with a template of a spine, spine, back and side flaps (like a dust cover). It required them to determine their central message and put it on the front cover and lay out the additional content in the other areas. They were also required to illustrate or diagram any associate images that best represented the cover.

“A good cover conveys the essence of the book. It is readable, and its message is clear. It also is aesthetically appealing.” 

Activity 4: What’s on your homepage?

From this we were then able to move onto an even more practical activity, outlining the clients expectations of the homepage – , the team were able to determine what essential information was – what their key messages were and any call-to-actions.

List the key elements you want to appear on your homepage

Participants brainstormed amongst themselves and then we listed the items on a piece of paper and discussed the importance (priority) of the page (i.e., above the fold, on the footer, etc.).

Activity 5: Sort your site.

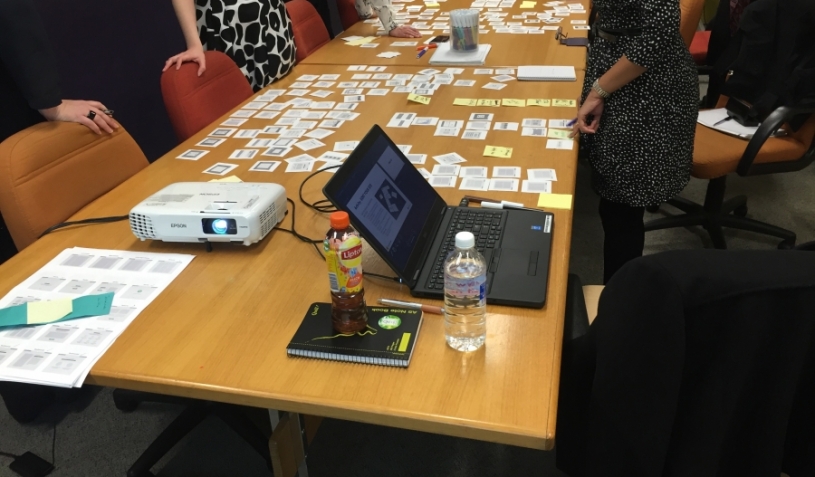
By this step the client now had some key ideas of what to include on the homepage; they were able to design a basic wireframe of the site right then and there on the workshop room table!

Armed with a couple of decks of custom designed UI cards, each with a different element, image, content, slider. The team split into two groups each with a deck of cards, and were able to sort through and mock up a layout of their homepage, coupled with some descriptive sticky notes; each group put together a basic wireframe of their homepage. Afterwards, each group took a look at each of the ‘wireframes’ and discussed the pro’s and con’s of each layout and were able to come up with a final version at the end.

I was then able to take this back to my desk and build a prototype of it at a later date.

Overall the workshop was a huge success from our previous methods of the design process, we received excellent feedback from the client on the content and execution of the workshop, and the UX team were able to walk away feeling confident they had a direction to go for the design of the website.

We’ve since used the workshop a couple of times, for various clients, each time resulted in the same positive response and helped with the project development greatly.

One of the key things that we learnt in both researching and conducting the course is that it saves a lot of time and hassle to include clients into the design process rather than acting as a service that provides endless small alterations of a design that can send both the client and designer nuts.

One of the unexpected benefits of this initiative is that running a professional workshop with clients also helps in asserting a level of authority within the developer – client relationship. By talking about, and sharing knowledge of user experience design you are showing the client that you essentially ‘know your stuff’, and you are not just another ‘designer’.

Branding to improve your bottom line

Many small businesses have been up and running a good while before they start thinking about branding and marketing. Of course, with the 101 things small business owners are faced with on an everyday basis this is understandable. However it is important not to underestimate the importance of good branding.

What is a brand?

You might have a great logo but that is only part of your brand. Everything about your business is your brand:

  • The name of your business
  • Your staff
  • Uniforms and office furniture
  • Colours that you use on your signs
  • Your sponsorship and support (such as sporting teams or community activities)

Your brand is essentially the set of ideas your business stands for in people’s minds. Visually this is seen such as through a logo, staff uniforms and office layout and location your brand is also shaped by your actions as a business. A successful brand will help differentiate you from your competitors, build loyalty, increase traffic, create brand advocates and help connect people emotionally to your business.

Creating your brand

Before you embark on building your brand presence you need first to spend some time thinking about the fundamentals of your brand. Considering the following questions will help you define your brand.

  • What is your purpose as a business?
  • What are your businesses core values?
  • Who is your target audience and what are their needs?
  • What do your customers think when they think of your business?
  • What differentiates your business from that of your competitors?
  • And most importantly, what is it you want your customers to think when your business comes to mind.

The great news is you don’t need a huge budget in place to build your brand. You will however need to invest some time and thought.

Marketing your brand

Think about the tone you use when you write, how you interact on with people on the phone, what things you post on social media and what visual images you use. Remember all of this is a reflection of your business and your brand values.

Try using your ‘About Us’ page on your website to give customers a feel for the people behind the business. ‘Meet the team’ or ‘behind the scenes’ can give a face to your business and help people build an emotional connection to your brand.

Be consistent with your visual style, use the same fonts on all of your written materials. Link your logo in with any products or services you advertise and use your designated business colours throughout all of your activities from the business premises through to staff uniforms. Everything should be a reinforcement of your brand.

Customers should see your brand colours and immediately think of you and your business.

Follow Me

Get In Touch

Contact me about a work opportunities

Copyright © 2020 Heath Design Studio

Search